Dlib & OpenCV

การใช้งาน Dlib และ OpenCV ในการประมวลผลภาพ

ตรวจจับใบหน้าและรู้จำใบหน้าด้วย Dlib และ OpenCV

ปัจจุบัน เทคโนโลยีการรู้จำใบหน้า (Face Recognition) ได้รับความนิยมและถูกนำไปใช้ในหลากหลายด้าน เช่น การรักษาความปลอดภัย การระบุตัวตน และการตรวจสอบข้อมูลส่วนบุคคล โดย OpenCV และ Dlib เป็นสองเครื่องมือสำคัญที่ถูกนำมาใช้ในการพัฒนาระบบดังกล่าว เนื่องจากมีประสิทธิภาพสูงและใช้งานได้หลากหลาย

วัตถุประสงค์

  • เพื่อศึกษาแนวทางการพัฒนาระบบรู้จำใบหน้าด้วย Dlib และ OpenCV
  • เพื่อเรียนรู้กระบวนการทำงานของระบบรู้จำใบหน้าตั้งแต่การตรวจจับใบหน้า การแยกจุดเด่น และการเปรียบเทียบใบหน้า
  • เพื่อสร้างความเข้าใจเกี่ยวกับการใช้งาน Dlib และ OpenCV ในการพัฒนาระบบ

ความรู้เบื้องต้นเกี่ยวกับ Face Recognition

การรู้จำใบหน้าเป็นกระบวนการทางคอมพิวเตอร์ที่เกี่ยวข้องกับการวิเคราะห์และเปรียบเทียบข้อมูลลักษณะเด่นของใบหน้า โดยกระบวนการหลัก ๆ ประกอบด้วย

  • Face Detection การตรวจจับใบหน้าในภาพหรือวิดีโอ
  • Feature Extraction การดึงจุดเด่นของใบหน้า เช่น ดวงตา จมูก และปาก
  • Face Matching การเปรียบเทียบลักษณะเด่นของใบหน้ากับฐานข้อมูล

Dlib และ OpenCV

  1. Dlib เป็นไลบรารีที่พัฒนาเพื่อการเรียนรู้เชิงลึกและการประมวลผลภาพ โดยมีฟังก์ชันเด่นสำหรับการวิเคราะห์ใบหน้า ได้แก่

    • Face Detection ใช้อัลกอริทึม HOG (Histogram of Oriented Gradients) ร่วมกับ SVM (Support Vector Machine) เพื่อการตรวจจับใบหน้า
    • Face Landmark Detection การตรวจจับจุดสำคัญบนใบหน้า เช่น ตำแหน่งดวงตา จมูก และปาก
    • Face Recognition ใช้ Deep Learning ในการสร้าง Embedding สำหรับการเปรียบเทียบใบหน้า
  2. OpenCV เป็นไลบรารีโอเพนซอร์ซที่ได้รับความนิยมในด้านการประมวลผลภาพและวิดีโอ โดยมีฟังก์ชันเด่นดังนี้

    • การตรวจจับวัตถุ เช่น ใบหน้า (ใช้ Haar Cascade หรือ DNN-based detectors)
    • การประมวลผลภาพ เช่น การแปลงสี การกรอง และการปรับแต่งภาพ
    • รองรับการรวมกับ Dlib เพื่อเพิ่มความสามารถในการรู้จำใบหน้า

ใน dlib เองจะมี function ซึ่งใช้ Histogram of Oriented Gradients (HOG) ร่วมกับ Linear SVM (Support Vector Machine) เพื่อสร้างโมเดลสำหรับการตรวจจับใบหน้า โดยเฉพาะการตรวจจับใบหน้าที่อยู่ด้านหน้าหรือหันเข้ากล้อง (frontal face detection)

ตัวอย่าง code ตรวจจับใบหน้าจากรูปภาพ

import cv2
import dlib 
 
detector = dlib.get_frontal_face_detector()
 
img = cv2.imread("path/image.png")
gray = cv2.cvtColor(img, cv2.COLOR_BGR2GRAY)
 
faces = detector(gray)
for face in faces:
  x, y, w, h = face.left(), face.top(), face.width(), face.height()
  cv2.rectangle(img, (x, y), (x + w, y + h), (238, 111, 0), 2)
 
while True:
  cv2.imshow("Face", img)
  key = cv2.waitKey(1)
  if key == ord('q'):
    break
 
cv2.destroyAllWindows()

กระบวนการตรวจจับใบหน้าด้วย HOG + SVM

Histogram of Oriented Gradients (HOG) เป็นเทคนิคในการแปลงภาพให้เป็นข้อมูลลักษณะเชิงสถิติที่ช่วยบ่งบอกรูปร่างและขอบของวัตถุในภาพ

  • แปลงภาพเป็นภาพขาวดำ (grayscale) เพื่อลดความซับซ้อน
  • คำนวณกราดิเอนต์ (gradient) ของแต่ละพิกเซลในภาพ ซึ่งแสดงถึงทิศทางการเปลี่ยนแปลงของค่าความเข้มของแสง
  • แบ่งภาพเป็นเซลล์ (cells) และสร้างฮิสโตแกรมของทิศทางกราดิเอนต์ในแต่ละเซลล์
  • นำเซลล์มารวมเป็นบล็อก (blocks) เพื่อปรับขนาดและทำให้มีความคงทนต่อการเปลี่ยนแปลงของแสงและการหมุนของวัตถุ
  • ได้ผลลัพธ์เป็นเวกเตอร์คุณลักษณะที่แสดงถึงภาพใบหน้า

โมเดล Linear SVM ถูกใช้เพื่อแยกแยะลักษณะของใบหน้าจากลักษณะอื่น ๆ โดยใช้เวกเตอร์คุณลักษณะที่ได้จาก HOGF โดยทำหน้าที่ในการหาขอบเขตเส้นแบ่ง (hyperplane) ที่เหมาะสมที่สุดในการจำแนกวัตถุในข้อมูล

code แสดงการทำงาน

import cv2
import matplotlib.pyplot as plt
from skimage.feature import hog
 
# โหลดภาพ
image_path = "images/me.png"  # ใส่ path ของภาพที่ต้องการ
image = cv2.imread(image_path)
image_rgb = cv2.cvtColor(image, cv2.COLOR_BGR2RGB)
image_gray = cv2.cvtColor(image, cv2.COLOR_BGR2GRAY)
 
# แสดงภาพต้นฉบับและภาพขาวดำ
plt.figure(figsize=(12, 6))
plt.subplot(1, 2, 1)
plt.imshow(image_rgb)
plt.title("Original Image")
plt.axis("off")
 
plt.subplot(1, 2, 2)
plt.imshow(image_gray, cmap="gray")
plt.title("Grayscale Image")
plt.axis("off")
plt.show()
 
# การแบ่งภาพเป็นเซลล์และการคำนวณ HOG
cell_size = (8, 8)  # ขนาดของเซลล์
block_size = (2, 2)  # ขนาดของบล็อก (กี่เซลล์ต่อบล็อก)
nbins = 9  # จำนวน bins สำหรับทิศทางกราดิเอนต์
 
# คำนวณ HOG features
hog_features, hog_image = hog(
    image_gray,
    orientations=nbins,
    pixels_per_cell=cell_size,
    cells_per_block=block_size,
    block_norm="L2-Hys",
    visualize=True,
    feature_vector=True,
)
 
# แสดงภาพ HOG
plt.figure(figsize=(12, 6))
plt.subplot(1, 2, 1)
plt.imshow(image_gray)
plt.title("Image (for comparison)")
plt.axis("off")
 
plt.subplot(1, 2, 2)
plt.imshow(hog_image)
plt.title("HOG Image")
plt.axis("off")
plt.show()
 
# แสดงเวกเตอร์คุณลักษณะ (Feature Vector)
plt.figure(figsize=(12, 4))
plt.plot(hog_features, color='blue')
plt.title("Feature Vector from HOG")
plt.xlabel("Feature Index")
plt.ylabel("Value")
plt.show()

Facial Landmark Detection

การตรวจจับจุด landmark บนใบหน้า โดยจะใช้โมเดล shape_predictor_68_face_landmarks.dat ของ dlib ซึ่งสามารถระบุตำแหน่งจุดสำคัญบนใบหน้าได้ 68 จุด ครอบคลุมตำแหน่งต่าง ๆ เช่น ดวงตา คิ้ว จมูก ปาก และกรอบใบหน้า

ตัวอย่าง code

import cv2
import dlib
import matplotlib.pyplot as plt
 
# โหลดโมเดลตรวจจับใบหน้าและจุด landmark
detector = dlib.get_frontal_face_detector()
predictor = dlib.shape_predictor("models/68_face_landmarks.dat") #shape_predictor_68_face_landmarks.dat
 
# อ่านภาพ
image_path = "Image.jpg"
img = cv2.imread(image_path)
img_rgb = cv2.cvtColor(img, cv2.COLOR_BGR2RGB)  # แปลงภาพเป็น RGB เพื่อการแสดงผล
gray = cv2.cvtColor(img, cv2.COLOR_BGR2GRAY)    # แปลงภาพเป็นขาวดำ (Grayscale)
 
# ขั้นตอนที่ 1: แสดงภาพต้นฉบับและภาพขาวดำ
plt.figure(figsize=(12, 6))
plt.subplot(1, 2, 1)
plt.imshow(img_rgb)
plt.title("Original Image")
plt.axis("off")
 
plt.subplot(1, 2, 2)
plt.imshow(gray, cmap='gray')
plt.title("Grayscale Image")
plt.axis("off")
plt.show()
 
# ตรวจจับใบหน้าในภาพ
faces = detector(gray)
 
# ขั้นตอนที่ 2: วาดกรอบรอบใบหน้าที่ตรวจจับได้
img_faces = img_rgb.copy()
for face in faces:
    x, y, w, h = (face.left(), face.top(), face.width(), face.height())
    cv2.rectangle(img_faces, (x, y), (x + w, y + h), (255, 0, 0), 2)  # วาดกรอบสีน้ำเงินรอบใบหน้า
 
plt.figure(figsize=(8, 6))
plt.imshow(img_faces)
plt.title("Detected Faces with Bounding Boxes")
plt.axis("off")
plt.show()
 
# ขั้นตอนที่ 3: ตรวจจับจุด landmark และวาดบนภาพ
for face in faces:
    # ตรวจจับจุด landmark บนใบหน้า
    landmarks = predictor(gray, face)
    
    # วาดจุด landmark (68 จุด)
    for n in range(68):
        x = landmarks.part(n).x
        y = landmarks.part(n).y
        cv2.circle(img_rgb, (x, y), 2, (0, 255, 0), -1)  # วาดจุดสีเขียวบนจุด landmark
 
# แสดงภาพพร้อมจุด landmark
plt.figure(figsize=(8, 6))
plt.imshow(img_rgb)
plt.title("Face Landmarks (68 Points)")
plt.axis("off")
plt.show()

Face Encoding

การสร้าง Face Encoding โดยเราจะใช้ตำแหน่งของจุด Landmark (68 จุด) ในการ Encoding ด้วยโมเดล dlib_face_recognition_resnet_model_v1.dat ซึ่งใช้สถาปัตยกรรม ResNet (Residual Network) ในการ encode ใบหน้าออกมาเป็นเวกเตอร์ 128 ค่า โดยเวกเตอร์นี้เป็น array ที่มีค่าตัวเลข 128 ค่า ซึ่งเป็นการแทนคุณลักษณะเฉพาะของใบหน้า สามารถนำไปใช้เปรียบเทียบใบหน้าระหว่างบุคคลได้

กระบวนการเปรียบเทียบใบหน้า ทำได้โดยการแปลงใบหน้าแต่ละใบเป็นเวกเตอร์ 128 ค่า และใช้ระยะทางระหว่างเวกเตอร์เพื่อพิจารณาว่าใบหน้าตรงกันหรือไม่ โดยรูปแบบนี้มีประสิทธิภาพและแม่นยำสูงในการระบุว่าใบหน้าสองใบหน้าเหมือนกันหรือไม่ แม้ว่าจะมีการเปลี่ยนแปลงเล็กน้อยในลักษณะภายนอก

ยกตัวอย่างเช่น เรามีใบหน้า A และ B

  • ใบหน้า A มีเวกเตอร์: [0.123, -0.234, 0.354, ..., -0.123]
  • ใบหน้า B มีเวกเตอร์: [0.125, -0.230, 0.350, ..., -0.120]

จากนั้นเราจะคำนวณ ระยะห่าง Euclidean ระหว่างสองเวกเตอร์ หากระยะห่างน้อยกว่าเกณฑ์ที่ตั้งไว้ (เช่น 0.6) ก็ถือว่าใบหน้าทั้งสองใบหน้าคือบุคคลเดียวกัน

ตัวอย่าง code การทำงาน โดยจะอ่านภาพจาก video แลล้วทำการเปรียบเทียบใบหน้า
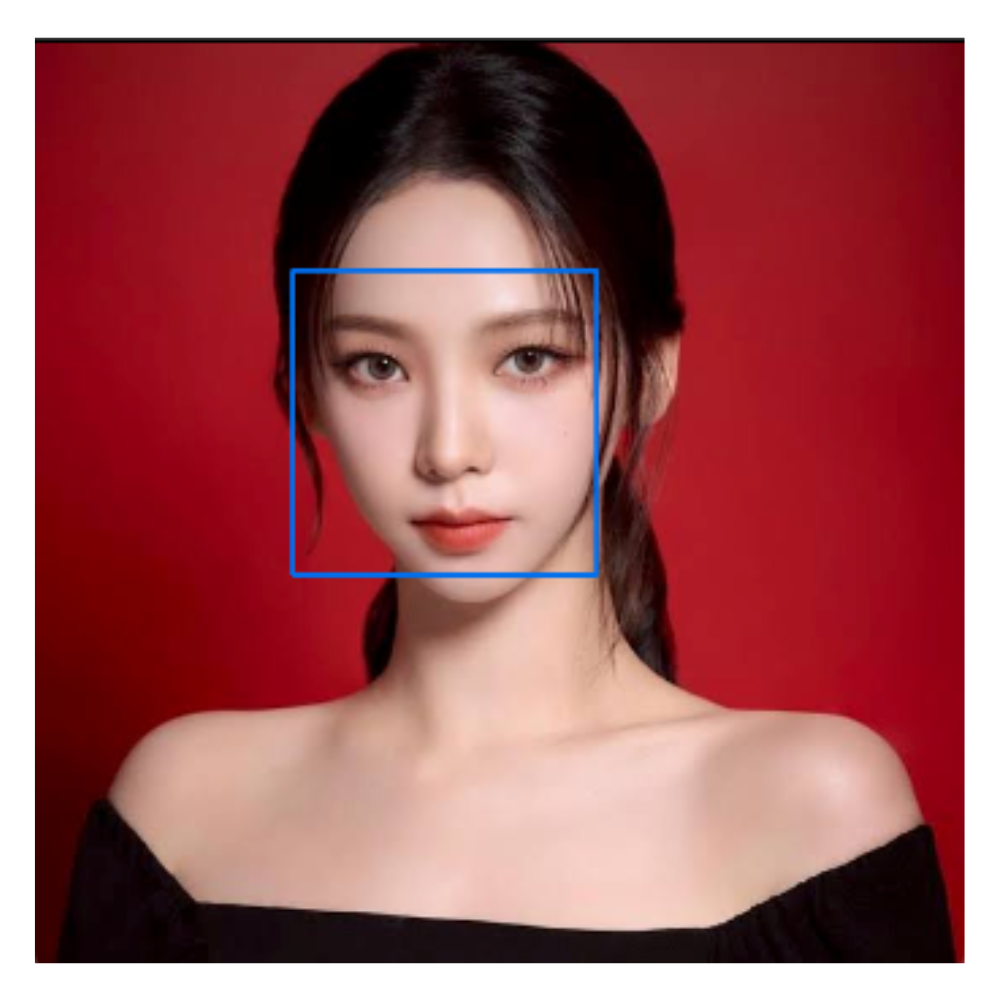
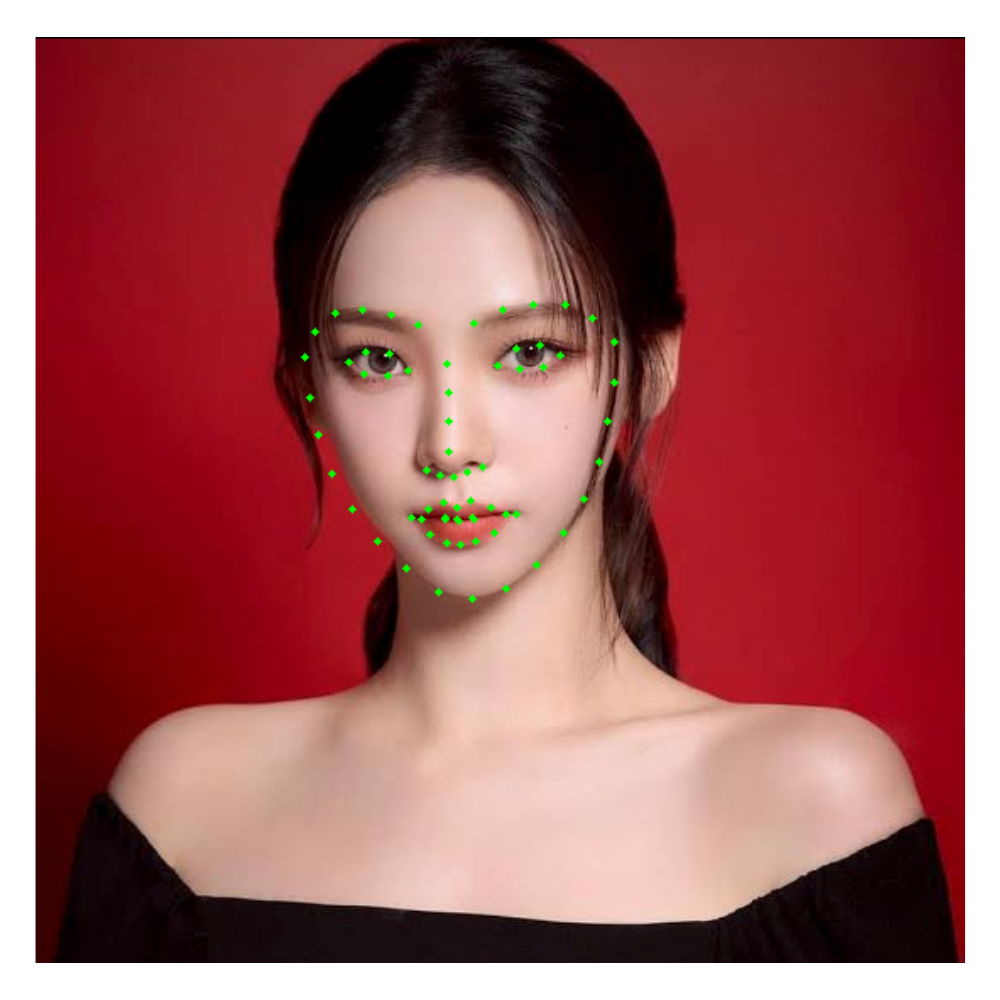
import cv2
import dlib
import numpy as np
import matplotlib.pyplot as plt
 
# โหลดโมเดลตรวจจับใบหน้าและจุด landmark
detector = dlib.get_frontal_face_detector()
predictor = dlib.shape_predictor("models/68_face_landmarks.dat") #shape_predictor_68_face_landmarks.dat
face_rec_model = dlib.face_recognition_model_v1("models/face_model_v1.dat") #dlib_face_recognition_resnet_model_v1.dat
 
 
def readVideoEncoding(video_path):
    encodings = []  # For storing encoding of each face found in frames
    print(f"Processing video: {video_path} ...")
    # Open the video file
    cap = cv2.VideoCapture(video_path)
    if not cap.isOpened():
        print(f"Could not open {video_path}. Skipping.")
        return None
 
    while cap.isOpened():
        ret, frame = cap.read()
        if not ret:
            break
        # Convert frame to grayscale
        gray = cv2.cvtColor(frame, cv2.COLOR_BGR2GRAY)
        faces = detector(gray)
        # Process each detected face
        for face in faces:
            landmarks = predictor(gray, face)
            # Get the encoding
            encoding = np.array(face_rec_model.compute_face_descriptor(frame, landmarks))
            print(encoding)
            encodings.append(encoding)
    
    # Release the video capture object
    cap.release()
    # Calculate the average encoding for the person in this video
    if encodings:
        avg_encoding = np.mean(encodings, axis=0)
        print("Avg_encoding")
        print(f"{avg_encoding}\n")
        return avg_encoding
    else:
        print(f"No face detected in {video_path}.")
        return None
    
def readImg_encoding(image_path):
    # อ่านภาพ
    img = cv2.imread(image_path)
    gray = cv2.cvtColor(img, cv2.COLOR_BGR2GRAY)
 
    # ตรวจจับใบหน้าในภาพ
    faces = detector(gray)
 
    if len(faces) == 0:
        print(f"No face detected in {image_path}")
        return None, img
 
    for face in faces:
        # ตรวจจับจุด landmark บนใบหน้า
        landmarks = predictor(gray, face)
 
        # วาดจุด landmark บนใบหน้า (68 จุด)
        for n in range(68):
            x = landmarks.part(n).x
            y = landmarks.part(n).y
            cv2.circle(img, (x, y), 2, (0, 255, 0), -1)
 
        # สร้าง Face Encoding โดยใช้เวกเตอร์ 128 ค่า
        encoding = np.array(face_rec_model.compute_face_descriptor(img, landmarks))
        return encoding, cv2.cvtColor(img, cv2.COLOR_BGR2RGB)  # แปลงเป็น RGB สำหรับการแสดงผลด้วย plt
 
# กำหนดพาธสำหรับภาพสองใบหน้า
face_A_path = "video/b1.mp4"  # ใบหน้า A
face_B_path = "images/193674.jpg"  # ใบหน้า B
 
# รับ Face Encoding และภาพพร้อม landmarks สำหรับทั้งสองใบหน้า
encoding_A = readVideoEncoding(face_A_path)
encoding_B, img_B = readImg_encoding(face_B_path)
 
if encoding_B is not None:
    # เปรียบเทียบ Face Encoding
    if encoding_A.shape != encoding_B.shape:
       print(f"Shape mismatch: karina has shape {encoding_A.shape}, while encoding_B has shape {encoding_B.shape}")
    else:
      distance = np.linalg.norm(encoding_A - encoding_B)
      print(f"Distance: {distance}")
      threshold = 0.45  # ระยะทางที่ตั้งไว้เพื่อพิจารณาว่าใบหน้าตรงกัน
 
    # คำนวณเปอร์เซ็นต์ความคล้ายคลึง
    similarity_percentage = max(0, (1 - distance / threshold) * 100)
 
    if distance < threshold:
        match_result = "Faces match!"
    else:
        match_result = "Faces do not match."
 
    # แสดงภาพและข้อความผลลัพธ์
    plt.figure(figsize=(12, 6))
 
 
    # แสดงภาพใบหน้า B
    plt.subplot(1, 2, 2)
    plt.imshow(img_B)
    plt.title("Face B with Landmarks")
    plt.axis("off")
 
    # แสดงผลลัพธ์
    plt.suptitle(
        f"{match_result}\nDistance: {distance:.4f} | Threshold: {threshold}\nSimilarity: {similarity_percentage:.2f}%",
        fontsize=14, color='blue'
    )
    plt.show()
else:
    print("Face encoding could not be generated for one or both images.")

Github

สรุป

การพัฒนาเทคโนโลยี Face Recognition ด้วย Dlib และ OpenCV เป็นกระบวนการที่มีประสิทธิภาพสูง โดยอาศัยการตรวจจับใบหน้า การดึงจุดเด่น และการเปรียบเทียบใบหน้า เทคโนโลยีนี้มีศักยภาพในการประยุกต์ใช้งานในหลายด้าน ทั้งด้านความปลอดภัยและการยืนยันตัวตน ซึ่งถือเป็นก้าวสำคัญของนวัตกรรมในยุคปัจจุบัน

avatar
Written byPhonsing Taleman